If you’re just getting started with website tracking and analytics, Google Tag Manager (GTM) is one of the most useful tools you can use… and it’s free.
It helps you manage things like tracking clicks, form submissions, page views, and more, without needing a developer every time. But before you can use it, you need to set up your account. Let’s walk through the setup together.
Install Google Tag Manager – Step-by-Step Tutorial
Step 1: Go to Google Tag Manager
Visit https://tagmanager.google.com and sign in using your Google account (the same one you use for Gmail or Google Analytics).
👉 Haven’t created a Google Analytics account yet? Follow this simple setup guide first.
Step 2: Create a New Account
Once you’re logged in:
Click the “Create Account” button.
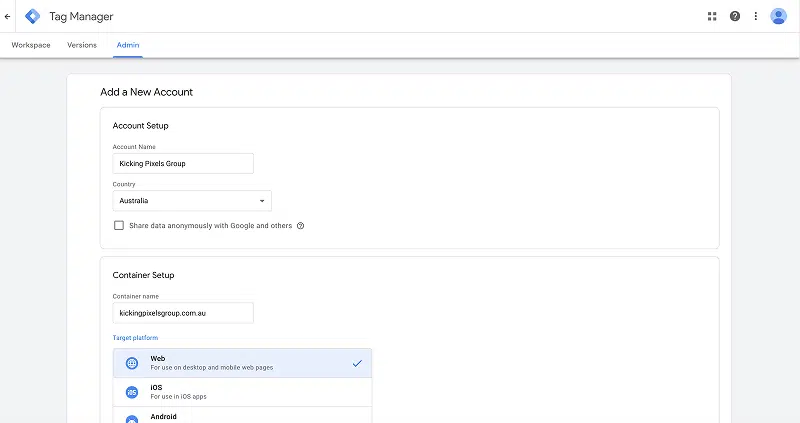
Fill in the following:
- Account Name: Usually your business name.
- Country: Select your country.
- Container Name: This is usually your website URL (e.g., mywebadvantage.com.au)
- Target Platform: Choose “Web.”
Then click “Create“.
Step 3: Accept the Terms of Service
Read through the terms, tick the boxes, and click “Yes” or “Accept” to continue.
Step 4: Install Google Tag Manager on Your Website
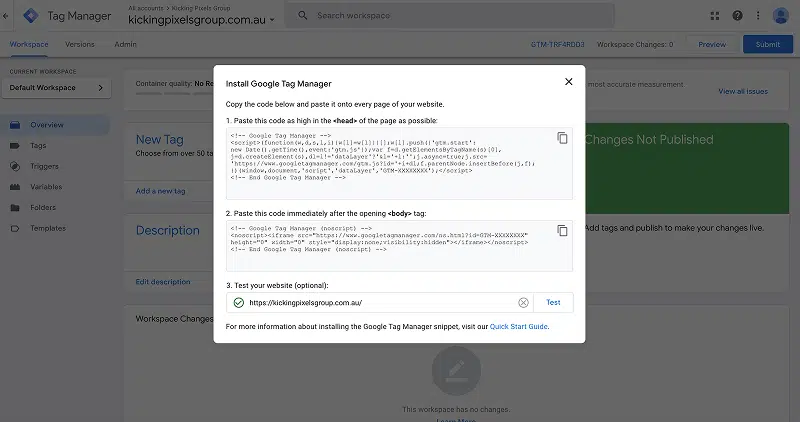
Next, you’ll be shown two pieces of code:
- The first code goes in the <head> section of your website
- The second code goes immediately after the opening <body> tag

If you’re using WordPress, you can install GTM using a plugin like: Tracking Code Manager.
Or if you have developer help, ask them to paste the code manually.
If you’re a MyWebAdvantage client, we can take care of this for you.
Step 4b: Install Google Tag Manager to your website
If you want to know how to do this yourself, follow the steps below…
- Go to your WordPress Website Dashboard (e.g. https://mywebsite.com.au/wp-admin/)
- Navigate to “Plugins” → “Add New“
- In the search bar, type “Tracking Code Manager”
- Click “Install Now“, and once installed, then click “Activate“
![]()
- Go to “Settings” → “Tracking Code Manager“
![]()
- If this is your first Tracking Code you’ll see a notice “Your tracking code list is empty, please “CLICK HERE” to create new ones”
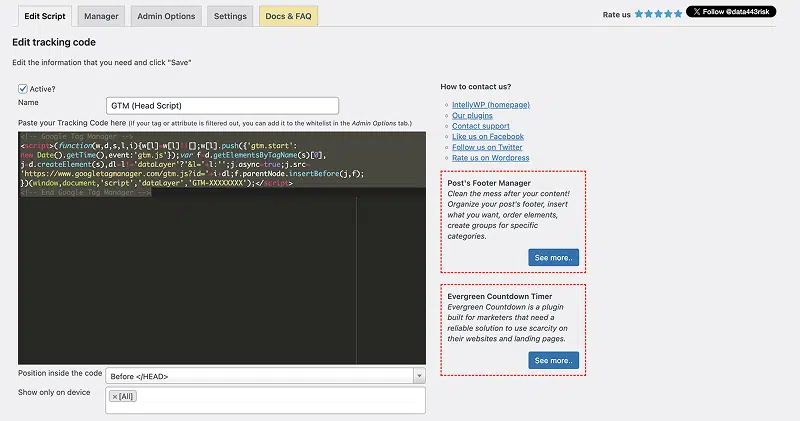
- Then, paste your 2 GTM scripts from Google Tag Manager (see Step 4 above) into the space provided. You’ll need to “Add new Tracking Code” for each script
<Head> Script
Copy the <head> code from GTM in the space provided (see below)
The remaining options in Tracking Code Manager are as follow:
- Show on: All
- Where do you want to add this code? Choose:
- In which page do you want to insert this code? Choose: In the whole website (pages, posts and archives)
- Finally, Click “Save“
<Body> Script
Copy the <body> code from GTM in the space provided (see below)

The remaining options in Tracking Code Manager are as follow:
- Show on: All
- Where do you want to add this code? Choose:
- In which page do you want to insert this code? Choose: In the whole website (pages, posts and archives)
- Finally, Click “Save“
Step 5: You’re In!
Once the code is installed on your site, head back to GTM, add your website address and click “Test” to test that it’s working.
From here, you can start creating tags – for example, tracking a button click using this simple guide (link to previous post).
GTM for Beginners – Next up:
Ready to start collecting real data from your site? Let’s track button clicks using Google Tag Manager.
👉 Read: How to Track Button Clicks with Google Tag Manager (Beginner-Friendly Guide)
Need Help with Google Tag Manager Setup?
If you’re not sure where your website’s code lives, or you’d rather leave the setup to someone else – we’re here to help. At MyWebAdvantage, we can install GTM, connect your Google Analytics, and set up the tracking you need to make data-driven decisions (without all the jargon).
Book in a chat below or send us an enquiry to get started.